IT'S TIME TO GET CONNECTED!
IT'S TIME TO GET CONNECTED!
Select the device or service you're installing to get started.

Armstrong Internet + ENHANCED WI-FI INSTALLATION
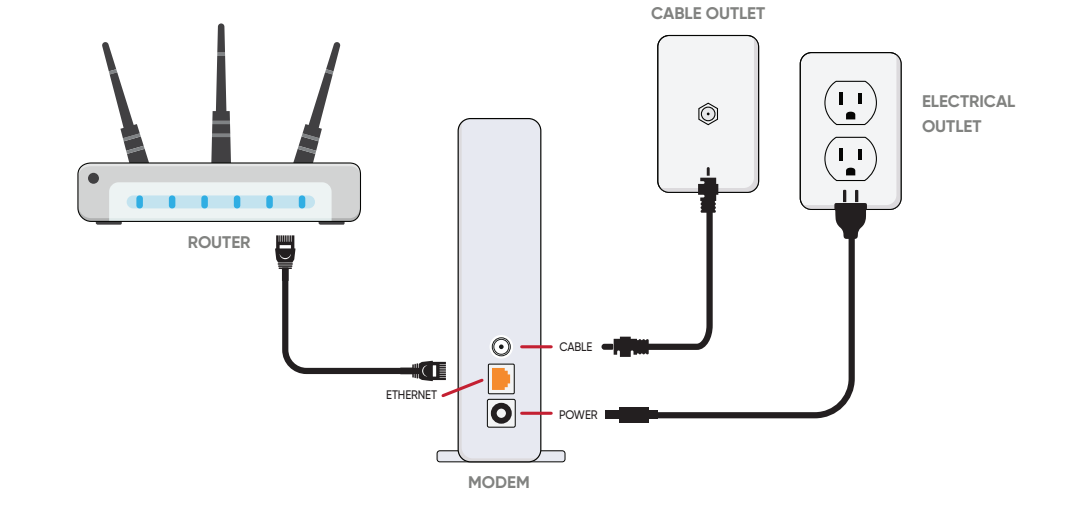
Step 1
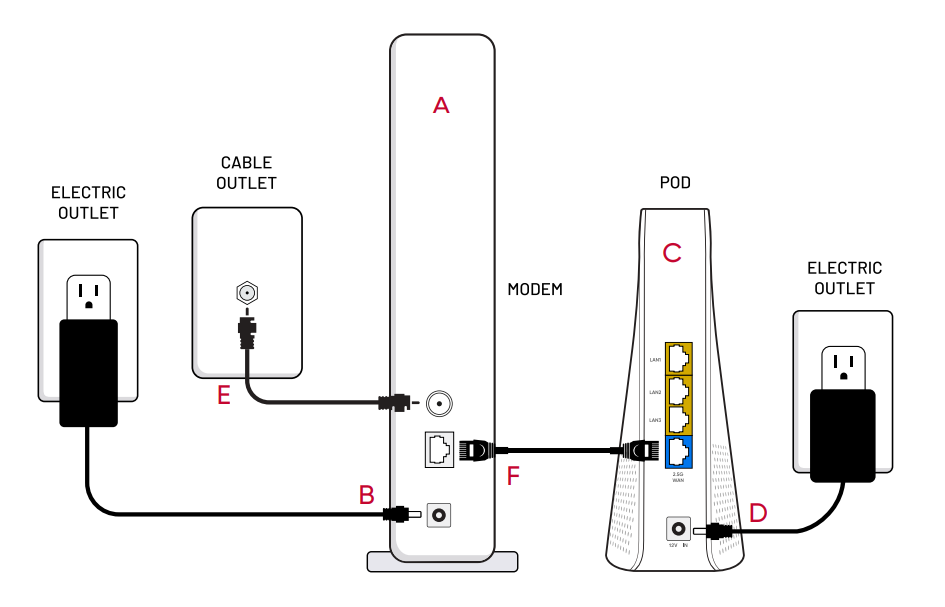
Connect coax cable to the back
of the modem.
Connect the other end of the
coax cable to the cable outlet.
Plug in the cable modem power supply
to the back of the cable modem.
Plug the power supply into the
electrical outlet.
Step 2
You will need to wait for the modem to
connect. This usually takes 3 to 5
minutes. The first 4 lights will be solid
once the modem is connected. If the
() and () lights are flashing blue, the
modem is taking an update. This can
take up to 20 minutes.
*The first 4 lights must be solid before continuing
Step 3
Connect the ethernet cable to port 1
on the back of the cable modem.
Connect the other end of the ethernet
cable to the right port on the back of
the pod.
Connect the pod power supply to the
power port on the pod.
Plug the power supply into the
electrical outlet.
Lights will flash off and on.
Once the lights are off, the pod
is online.
This usually takes 3 to 5 minutes.
Step 4
Download the Plume Home™ app.
Sign in to the Plume Home™ app
with your email address/username
that was provided with your order,
located on the Important
Information form in the box
(DO NOT create a “New Account.”)
![]()
![]()
Step 5
If you have a second pod, install the pod in a different room following the pod placement tips below.
Pod Placement Tips
Every house is different so the
placement of your pod(s) is
important.
*Equipment type may vary. Some pods plug directly into electrical outlet or lack power buttons.
Armstrong Internet + Enhanced Wi-Fi
Self-Installation Guide
GETTING STARTED WITH ENHANCED WI-FI
1. Before starting installation, please verify that you have:
- Pod and one 6’ Ethernet cord
- Email and password that you set up during order
- Getting Started Guide
2. Start the activation process
- Log in to your account
- Verify the serial number of your pod
- Click Continue to activate pod
3. Plug in the Pod(s)
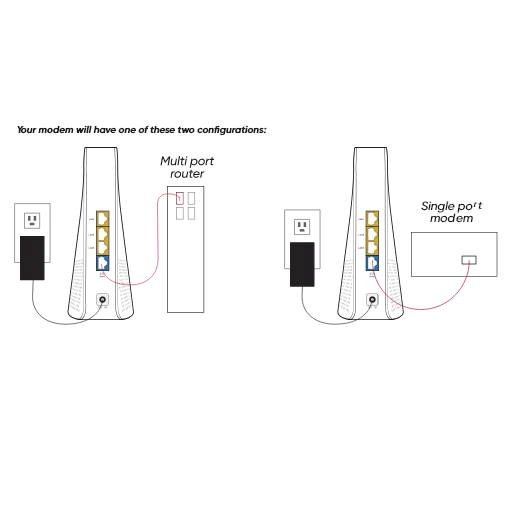
Plug Ethernet cable into port 1 of your Armstrong router or modem.
Plug other end of Ethernet cable into right Ethernet port of the pod. (Pod equipment type may vary.)
Your modem will have one of these two configurations.
4. Download the Plume Home™ app
Sign in to the app using the email and password that you set up during the order process
![]()
![]()
Enhanced Wi-Fi Self-Installation Guide
Enhanced Wi-Fi Self-Installation Guide
(for legacy EXP customers)

GETTING STARTED WITH Armstrong TV
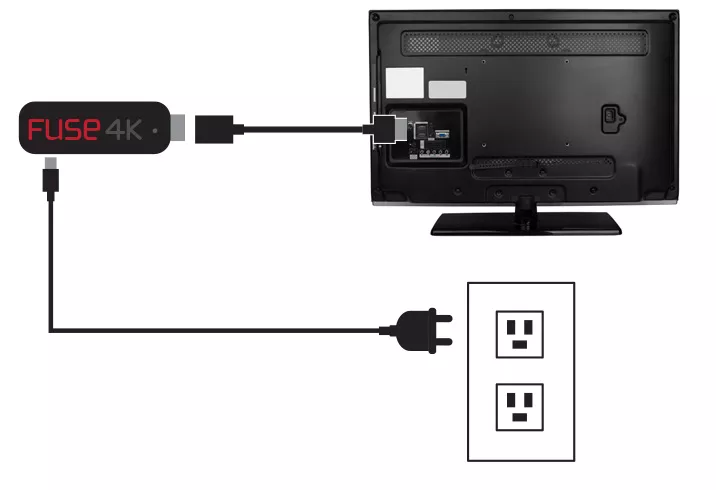
1. Connect the Armstrong TV box
Connect the Armstrong TV device directly into the HDMI port, or use the provided jumper cable. Keep in mind what the port is labeled on the back of your television.
2. Attach the power cord
Attach the provided power cord to the Armstrong TV device and plug the power adapter into a wall outlet or surge protector.
3. Follow the on-screen instructions
The first thing you
should see is the “Pair Your Remote” screen. If you do not,
use the remote that came with your TV to change to the
HDMI input you connected the box to in Step 1.
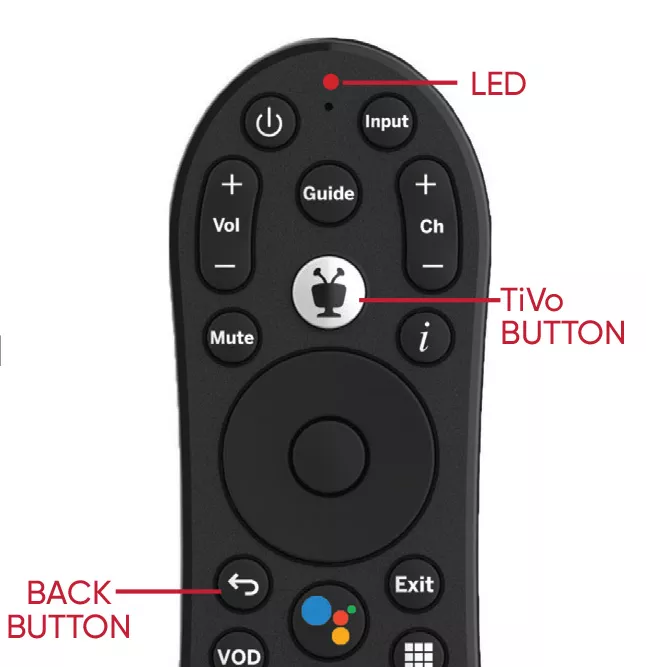
If your remote does not pair automatically, press
and hold the TiVo and Back buttons until the LED
on the remote lights up red. Once lit, release the
keys and the light will flash amber.
NOTE: If your remote does not light, double check
the orientation of the batteries as both batteries
will go in the same direction
4. Finish setup process
Continue following the on-screen prompts which will include choosing
a language, connecting to your Wi-Fi network, and signing into your
Google account. Your box will come pre-installed with some of the
most popular apps. To download additional apps, a Google account is
required to access the App store.
Don't have a Google account?
Click here to set up a free Google account.
5. Enjoy!
You now have access to your channels as well as thousands of apps.
Armstrong TV Self-Installation Guide
Armstrong TV Remote Control Guide
Armstrong TV Big Remote Control Guide

INSTALLING YOUR NEW MODEM
Step 1
Transfer the COAXIAL CABLE connector from your old modem to the new one. This wire connects to the cable outlet in your home. Tighten with included disposable wrench.
Step 2
Connect the power adapter from the POWER port to the electrical outlet.
Step 3
Transfer the ETHERNET cable from your old modem to the new one. This wire connects the modem to your router.
Modem Self-Installation Guide